Prefetching subresources with Signed Exchanges
How to make your website load instantly for Google-referred users (part 2 of 8)

I will explain how to drastically improve your website's loading time for Google-referred users using a little-known technology called Signed Exchanges (SXG).
This is the second post in a series. I assume you read the previous part, which contains the fundamental knowledge required to understand and implement the techniques described here. If you don’t or need a refresher, I strongly suggest you click here.
Things to prefetch
You learned how to use SXG to prefetch HTML on Google search results. It was an essential step, but further work is required to fully utilize SXG and make your website load in a fraction of a second. If—apart from HTML—you prefetch also:
stylesheets, the user can immediately start reading the text and see the final page layout without images,
images, preferably the above-the-fold ones, the actual improvements to LCP will materialize,
a custom font (if you use it), the user will experience stable-looking text, potentially improving CLS; on pages with a lot of text above the fold, LCP should improve, too,
javascript, you will make your page interactive1 the moment the user clicks the Google result link.
Fully prefetched website experience
If you implement prefetching of all of the above, your website will load instantaneously and become fully interactive, despite the connection quality, given it had enough time to prefetch on the Google results page.
Below, I demonstrate how it works while offline. You just can’t make your connection slower than that!
This is a vertical video, so if you are using mobile device, click here to open it in the YouTube app for best experience.
I began by ensuring the browser cache was empty, simulating a first-time visitor experience.
Next, I entered a search phrase and received results from Google. I enabled airplane mode to simulate the worst-case scenario for the connection.
After clicking the link to the website, the browser immediately displayed a fully rendered page. I quickly tested the interactive UI elements, confirming that the JavaScript had loaded correctly.
When I scrolled below the fold, it became clear that the images there were not prefetched. In real-world conditions, network performance should be better than offline, and images below the fold would load in the background as the user interacts with the page.
SXG subresources
In the SXG nomenclature, the assets you choose to prefetch along with the main HTML document are called subresources. Most of the time, these are above-the-fold images, styles, fonts, and critical scripts.
This post focuses on them in contrast to the lower-priority assets that can be fetched later, such as below-the-fold images, non-critical Javascript, etc.
Basic requirements and limits
Cacheability
The subresources have to be cachable, just like the main HTML document. You must set max-age/s-maxage directives in the Cache-Control header to a value greater than 120 seconds. Given that subresources are mainly static, immutable files, 1 year is a much better option. It will be truncated to 7 days for SXG, but other caches will use the longer period.
For assets included with the application, I used the following nginx configuration snippet in locations containing static files:
location ~* \.(?:css|js|gif|png|jpeg|jpg|ico|ttf|woff|woff2|svg)$ {
  expires 1y;
  add_header Cache-Control "public";
  passenger_enabled on; # Passenger is used as an app server
}
No more than 20
As far as I know, SXG spec doesn’t restrict the number of subresources. However, Google SXG cache limits them and Cloudflare ASX honors this limit.
If your website depends on more than 20 subresources, the SXG experience won’t be as good as it could be because those over the limit won’t be prefetched. For example, not all images will be immediately visible or the user won’t be able to fully interact with the website until the missing scripts are downloaded.
It’s therefore a good idea to keep the number of subresources below or equal to 20.

Scripts and CSS files
You may remember my website combines Ruby on Rails and Next.js. I will use those frameworks to illustrate how to deal with SXG challenges. Even if you use a different framework, the challenges may be similar.
Rails gives you full control over the HTML and therefore over all the <link> tags for preloading subresources, so keeping the number of script and CSS files low is easy.
In the case of Next.js apps, the chunking of the javascript and CSS is delegated to the framework (and handled in the background by webpack). If the framework or webpack decides to generate too many chunks, you are out of luck.
In my case, I found the number of generated CSS chunks reasonable. However, the number of javascript chunks was way too high.
By default, Next.js splits JavaScript into chunks to optimize loading. If page A shares some code with page B, Next.js will create three chunks:
Code used only on page A.
Code used only on page B.
Code shared between both pages.
When loading the pages, page A will load chunks #1 and #3, while page B will load chunks #2 and #3. This way pages avoid loading code they won’t use.
To solve the too-many-chunks problem I disabled this optimization on pages receiving the most of the Google traffic. This means users may download the same code again when accessing other pages on the website. I believe the performance impact is minimal since when the user decides to visit another page, most of the non-javascript parts of the page are already present in the browser cache.
To prevent Next.js from chunking javascript on specific pages you can extend your next.config.js using the following template:
function skipChunking(config, pages) {
  const originalChunks = config.optimization.splitChunks.chunks;
  config.optimization.splitChunks.chunks = (chunk) => {
    // Dissallow chunking of specified pages because too many
    // chunks break SXG experience. For the full context see:
    // https://blog.pawelpokrywka.com/p/subresources-prefetching-with-signed-exchanges
    if (pages.includes(chunk.name)) return false;

    return originalChunks(chunk);
  }
}

const nextConfig = {

  // Your current config options

  webpack: (config, options) => {
    // Replace with your own pages array.
    if (!options.isServer) skipChunking(config, ['pages/page1', ...]);

    // Your current webpack customizations go here

    return config;
  }
}

module.exports = nextConfig
Icons
Remember CSS sprites, popular when the majority of the web’s HTTP traffic used version 1.1? The idea was to put many images into one and use CSS to extract them on the client side.
HTTP/2 exorcised us from CSS sprites. That’s because HTTP/2 multiplexing allows us to perform many requests for small assets efficiently.
But if you have multiple icons on the page and want all of them to be prefetched with SXG, you have to:
embed them into HTML (increasing the size of your page), or
invite sprites back to your life.

You can also use an icon font, but it’s just a different implementation of the same idea.
You will find many online resources on how to use sprites, so I won’t rehash this subject here.
Cookies, HSTS & the rest
There are other requirements, but I think most of them should be already met. You don’t typically configure your web server so that static files set cookies, do you? And I assume you properly set the HSTS header, as I explained in the previous part.
The remaining requirements:
adjusting the main document to include subresources properly and
respecting the same-origin rule
are not that trivial and will be explained below.
Early hints
Before I explain how to adjust the HTML to prefetch subresources, let's take a step back and look at a different, more generic prefetching technique. It's called Early Hints, and it allows the browser to start fetching the assets required for the page before the application generates the HTML, enabling the page to load much faster.
Let's say your server takes a moment to generate HTML because it needs to fetch data from a slow database and process it using an overloaded CPU. With Early Hints, this time can be used by the browser to download CSS, fonts, and images. When the HTML is finally delivered, the browser has everything it needs to render the page instantly.
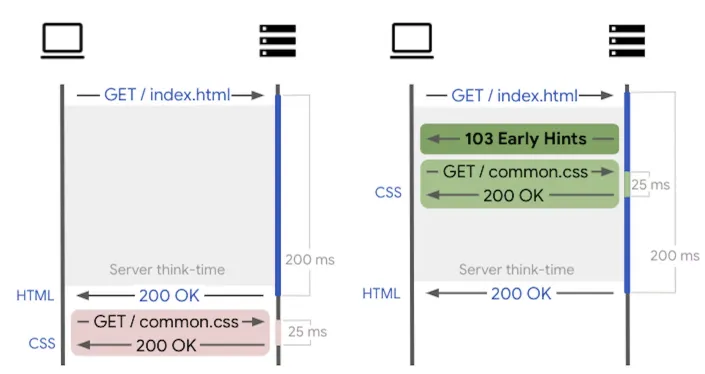
Technically, the server sends two responses: one with the URLs of the assets and another with the actual HTML content. This challenges the common expectation that a single HTTP request should result in only one response. It likely posed a challenge for developers working on browsers and web servers, as they had to adapt to handling multiple responses for a single request.
The server supporting Early Hints will check if your HTTP response contains a Link header:
Link: <https://www.example.com/style.css>;rel=preload;as=styleIf found, the server generates a separate HTTP response containing this header, followed by the actual HTTP response generated by the app when it's ready.
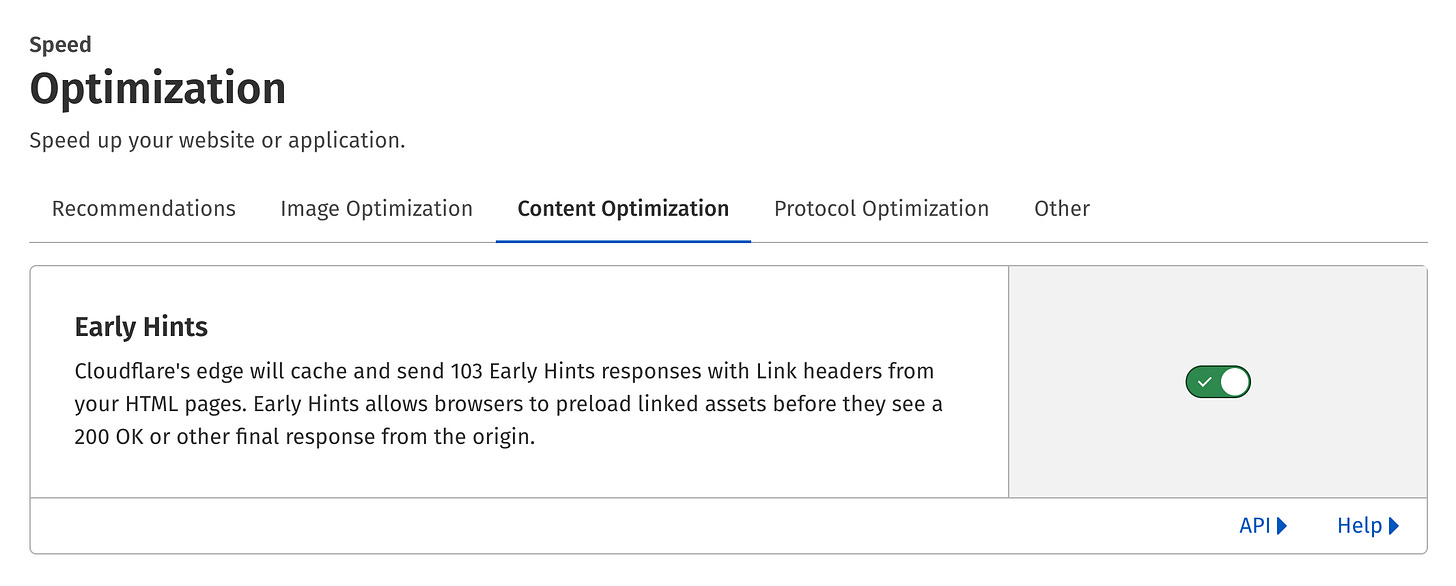
Early Hints is a generic mechanism, not tied to SXG. Therefore, it applies to all page loads, not just SXG prefetches. It's beneficial to have it enabled. In Cloudflare, you can do it in the Speed / Optimization / Content Optimization:
Standard prefetching
Even if you don’t use Early Hints, the Link header can be useful for standard prefetching.
If you observe that 95% of users landing on page A go to page B next, you can prefetch page B on page A. This way, those 95% of users will experience instant loading of page B (the remaining 5% will prefetch the page and won’t use it, screw them).
Having a Link header in the prefetched page will instruct the browser to prefetch assets mentioned there too, improving the user experience.
SXG-compatible HTTP header
To prefetch a SXG subresource, the browser needs it to be included in a Link header of the HTTP response with your HTML document. The header must point to the subresource and include the file's integrity hash (to ensure the subresource is not altered by malicious SXG cache). Here is an example entry for a stylesheet:
Link: <https://www.example.com/style.css>;rel=preload;as=style,<https://www.example.com/style.css>;rel=allowed-alt-sxg;header-integrity="sha256-H/W6sQAAk1YIBi/NE86aUkNQjVHcYjo6B7Rg3PQ0vDM="If you wonder why the subresource URL has to be duplicated, it’s because of the compatibility with responsive images mentioned later in this post.
To calculate the integrity hash, you must transform subresource content and its final HTTP headers2. Good luck with doing this in your application, especially given some resources are stored far away on the CDN!
Automating the generation of the Link header
HTTP Header
Fortunately, both Cloudflare Automated Signed Exchanges (ASX) and the SXG module for nginx offer a much easier solution. The only thing your app has to do is output the standard Link header in the HTTP response (the same one used to implement Early Hints):
Link: <https://www.example.com/style.css>;rel=preload;as=styleAs you can see, you can skip the integrity hash. ASX/nginx will download the required assets, calculate integrity hashes, generate the SXG-compatible Link header, and use it to replace the original one in the HTTP response.
HTML-only
This doesn’t work for the nginx SXG module, but when using Cloudflare, instead of setting the Link header as described above, you can put the <link> tag inside your HTML. Of course, this tag doesn’t need to include the integrity hash:
<link rel="preload" href="/style.css" as="style">Cloudflare ASX will parse the HTML, find those tags, download the assets, calculate integrity hashes, and finally generate the Link header and include it in the HTTP response to the SXG request.
This solution seems more elegant because you keep all asset references in the HTML. However, the drawback of not setting the Link header is you don’t get Early Hints and standard prefetching with subresources, because ASX doesn’t do it for non-SXG requests.
Prefetching of SXG subresources in Rails
Ruby on Rails automatically creates the Link header when you use helpers such as stylesheet_link_tag, javascript_include_tag, and preload_link_tag. I believe the original motivation was to activate Early Hints when available, but it helps3 with SXG too. Therefore, for most Rails apps, SXG prefetching will work automatically for assets loaded with these helpers.
You probably already use stylesheet_link_tag and javascript_include_tag helpers for CSS and scripts. Ensure you also add preload_link_tag for above-the-fold images and for fonts.
Prefetching of SXG subresources in Next.js
First, let’s clarify the goal. We want to:
prefetch SXG subresources and
benefit from Early Hints and standard prefetching with subresources.
Next.js doesn’t have a mechanism (yet) to set the Link header automatically for styles and javascript chunks. Unfortunately, the framework doesn’t give the developer access to the URLs of those assets either, so the developer can’t preload them manually. On the bright side, the framework preloads the styles using the <link> tag.
It means various subresource classes have varying support:
Fonts and images: SXG prefetching works using <link> tags in HTML, Early Hints/standard prefetching requires setting the Link header manually,
Stylesheets: SXG prefetching works out of the box, the Early Hints/standard prefetching mechanism is unsupported,
Javascript: neither SXG prefetching nor Early Hints/standard prefetching are supported.
In summary, most of the things don’t work.
How to fix it?
Adding support for the required features in Next.js and contributing the changes upstream is likely the best long-term solution. However, my team wasn’t deeply familiar with the framework’s internals, so this approach could take some time. I needed a quicker solution to address the issue.
The next idea was to read the HTTP response of the app, parse the HTML, and add the Link header using middleware. I considered:
Next.js middleware: at the current form it’s very basic and not capable of performing the task needed.
One of the nginx modules for transforming HTTP responses using high-level languages such as Lua or Javascript. It adds complexity to the server configuration and comes with the maintenance cost of supporting a custom nginx module.
Instead, I’ve decided to use a Cloudflare worker.
What is a Cloudflare worker?
A Cloudflare worker is a piece of software that runs on every request at the Cloudflare data center closest to the user. You deploy it at a specific URL prefix, and from that point on, it handles all matching requests.
The worker can generate responses on its own or make requests to your application, acting as middleware. You can find the documentation here.
For me, it was important, the solution:
uses Javascript, so it’s easy to write and extend,
has great performance and low latency,
doesn’t come with maintenance costs, because it’s hosted on Cloudflare,
has a negligible financial cost.
Worker requirements
The primary requirement was to enhance Next.js HTTP responses to support SXG prefetching and Early Hints/standard prefetching, without modifying responses generated by Rails.
To differentiate between responses that required adjustments and those that didn’t, I chose to check for the presence of the Link header. The worker was configured to modify only responses where this header was absent.
SXG subresources are used in documents, so the worker only had to process HTTP responses with HTML content. No need to alter images, CSS, etc.
The worker had two responsibilities:
Parse the HTML to find:
All <link> tags with the rel attribute set to preload, enabling Early Hints/standard prefetching for stylesheets (generated by the framework) and developer-specified subresources, such as images and fonts.
All <script> tags with the src attribute to enable Early Hints/standard prefetching and SXG prefetching for scripts, while ignoring inline scripts.
Use this information to add the appropriate Link header to the response.
Worker implementation
Let’s create the worker:
npm create cloudflare@latest -- link-adderThe wizard will ask a few questions:
├ In which directory do you want to create your application?
│ dir ./link-adder
│
├ What would you like to start with?
│ category Hello World example
│
├ Which template would you like to use?
│ type Hello World Worker
│
├ Which language do you want to use?
│ lang JavaScript
│

...

│
├ Do you want to use git for version control?
│ yes git
│

...

│
├ Do you want to deploy your application?
│ no deploy via `npm run deploy`
Now, let’s paste the following code into the src/index.js file:
export default {
  async fetch(request) {
    const response = await fetch(request);

    // Skip non-html responses and responses containing Link header
    const headers = response.headers;
    if (!(headers.get('content-type') || '').includes('text/html')) {
      return response;
    }
    if (headers.has('link')) return response;

    // Parse the HTML and find all the URLs to preload.
    // A detailed explanation can be found at:
    // https://blog.pawelpokrywka.com/p/subresources-prefetching-with-signed-exchanges
    const subresources = [];
    const rewriter = new HTMLRewriter()
      .on('link[rel*="preload"]', {
        element: link => (
          subresources.push({
            href: link.getAttribute('href'),
            as: link.getAttribute('as')
          })
        )
      })
      // No need to preload scripts:
      // - external to the site,
      // - intended for legacy browsers not supporting ES Modules.
      .on('script[src^="/"]:not([nomodule])', {
        element: script => (
          subresources.push({
            href: script.getAttribute('src'),
            as: 'script'
          })
        )
      });

    // Make sure to wait until parsing is complete
    const responseText = await rewriter.transform(response).text();

    // Prepare Link header value.
    // Escaping is left as an exercise for the reader.
    const linkText = subresources
      .map(({ href, as }) => `<${href}>; rel=preload; as=${as}`)
      .join(',');

    // Prepare mutable headers object and add the Link header
    const newHeaders = new Headers(headers);
    if (linkText) newHeaders.set('link', linkText);

    // Prepare modified response
    const newResponse = new Response(responseText, {
      headers: newHeaders,
      status: response.status,
      statusText: response.statusText
    });

    return newResponse;
  }
};
And deploy the worker:
npm run deployIf doing this for the first time, you will be asked to authorize at Cloudflare.
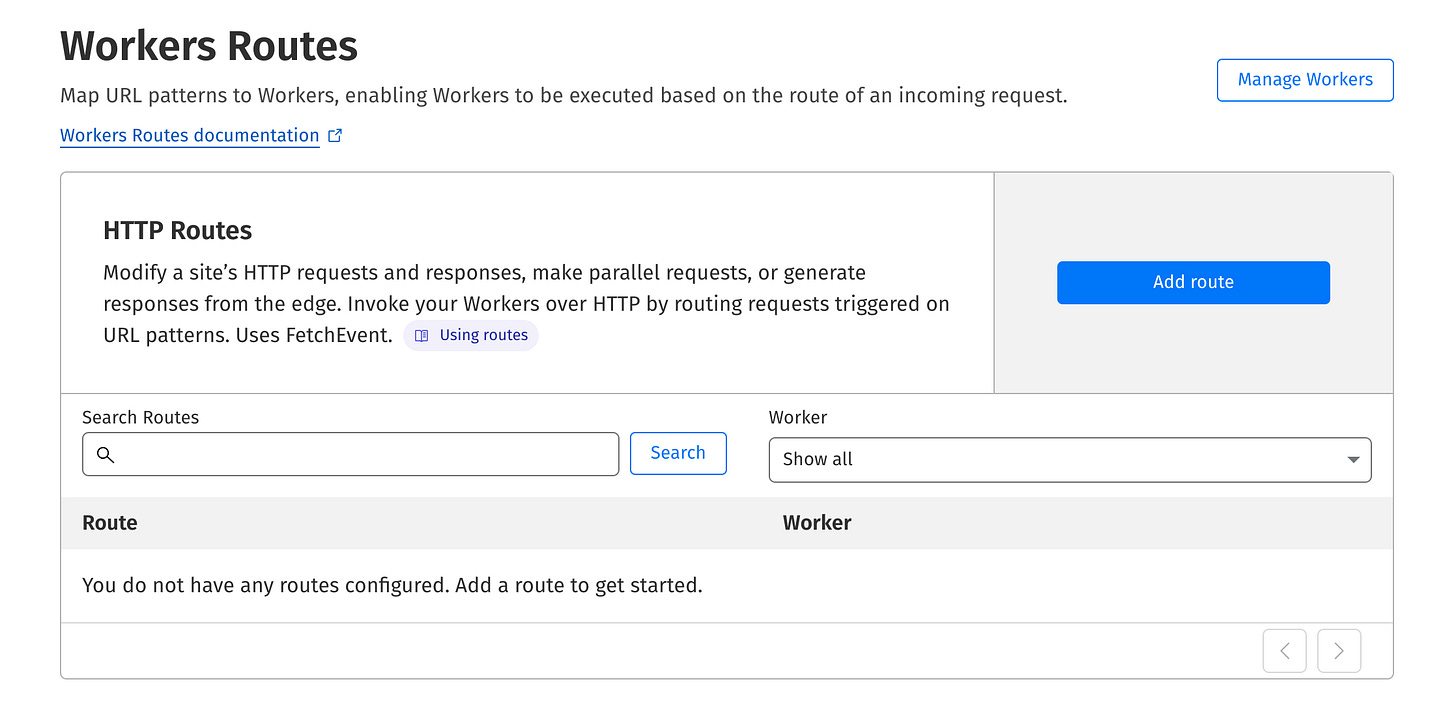
We have the worker ready, now it’s time to set up the routing. Go to your website configuration in the Cloudflare admin panel and enter the Worker Routes section.
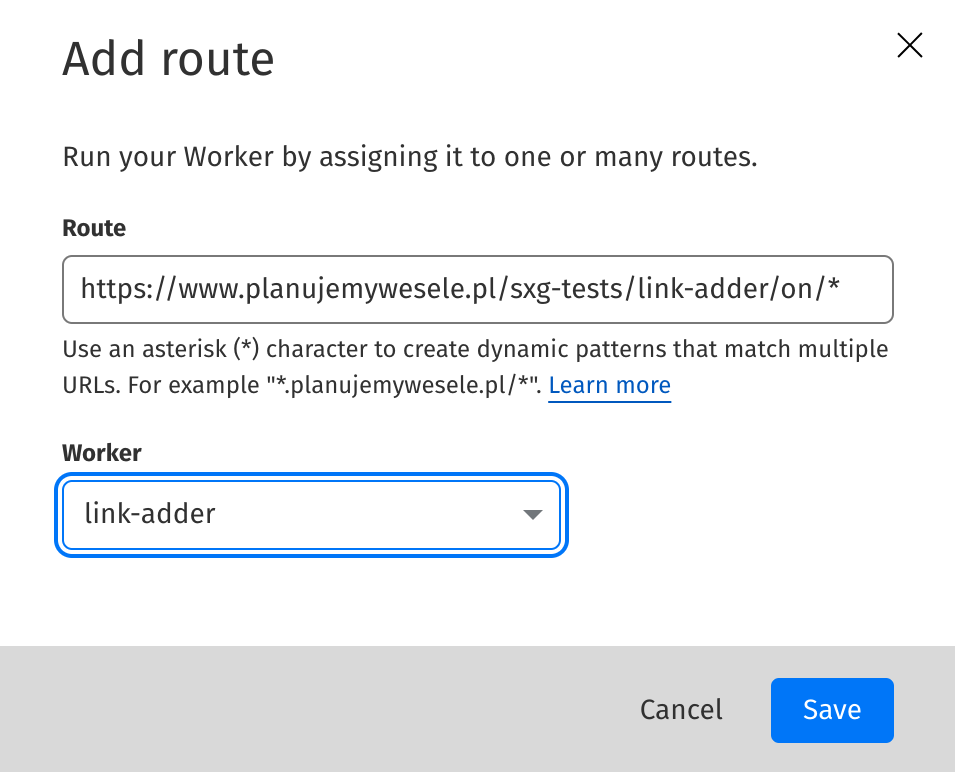
Let’s add the route by clicking the Add route button:
In the example above, I provided a test URL and selected a worker from the drop-down menu. In a real deployment, once everything is working as expected, the route should be updated to cover the entire site or at least the sections handled by Next.js.
After clicking the Save button, the worker should be fully functional.
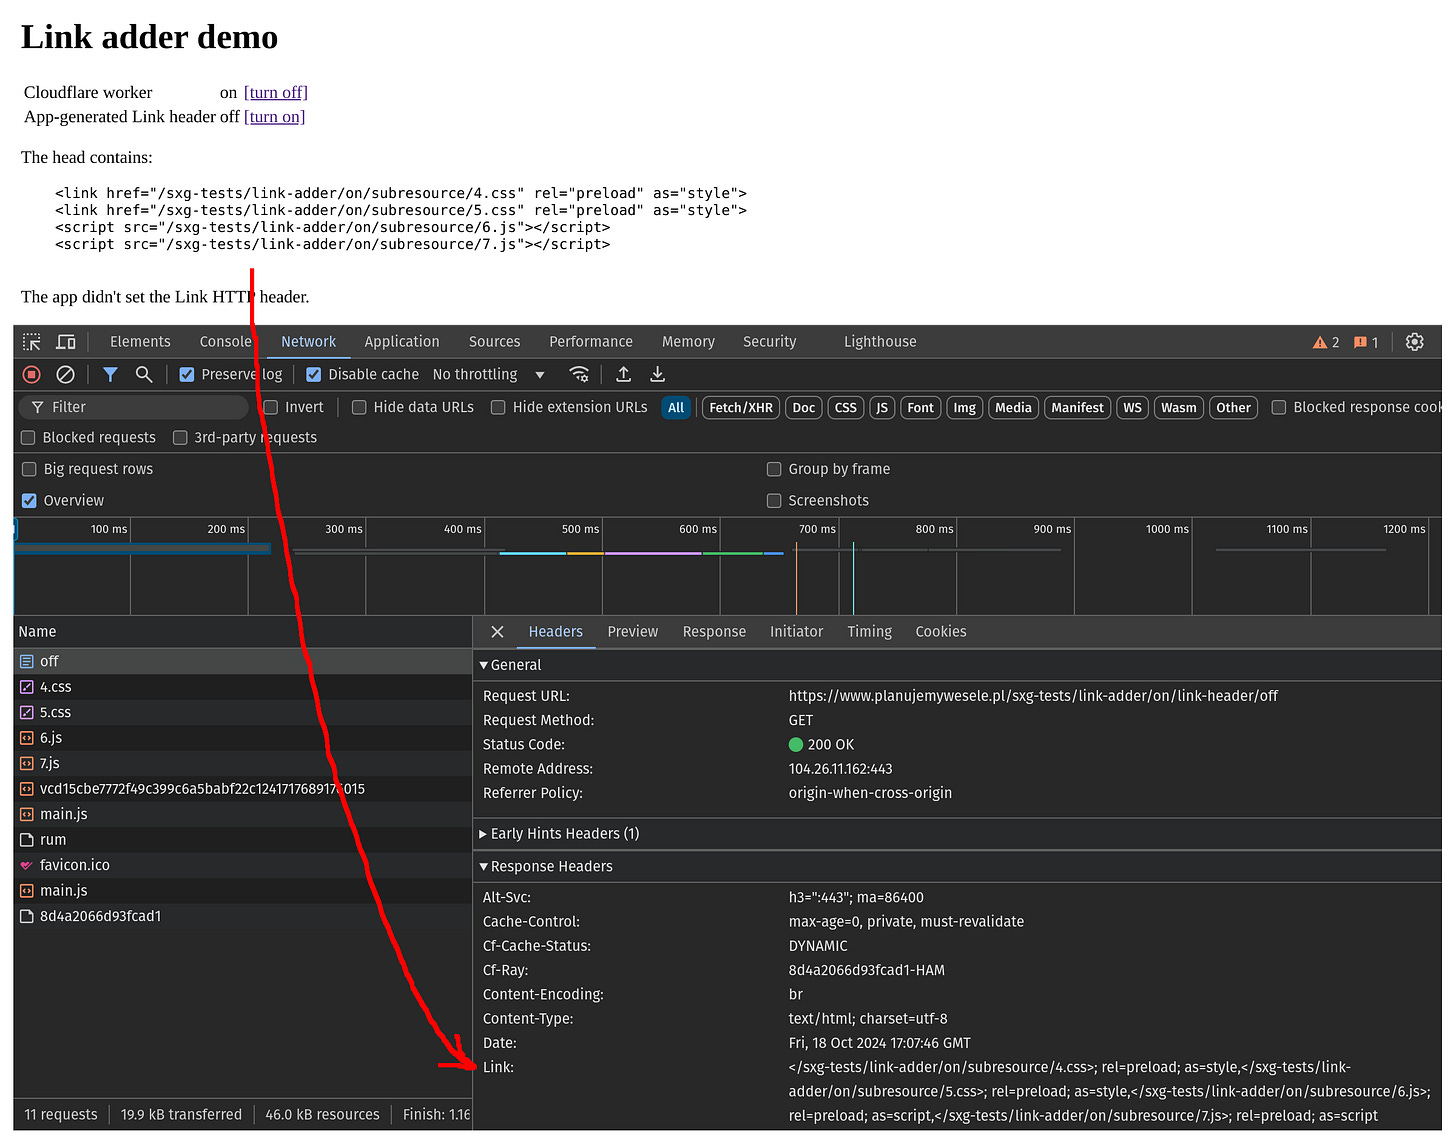
To check if the worker does what it should visit the URL specified in the route with Chrome DevTools opened on the Network tab. You can compare the original app response to the one processed by the worker. Here is how the processed HTTP response looks like:
You can see above, the URLs for preload links and scripts were included in the Link HTTP header.
When comparing the responses you can also compare timing and see that the worker overhead is negligible.
From now on, the pages generated by Next.js will support Early Hints/standard prefetching and SXG subresource prefetching.
This worker is not specific to Next.js, it could be used to fix responses of any framework with similar issues.
Same-origin requirement
Issue with CDNs
It’s common practice to use a Content Delivery Network (CDN) for asset hosting, with images being probably the most frequently hosted type of content. The idea is to leverage the CDN’s high-performance, global network of servers, which are optimized for efficiently hosting static files. This reduces the load on your own infrastructure, allowing your servers to focus on running the application more effectively.
In these scenarios, your website at https://www.your-domain.com/ might reference assets from one of the following URL types:
CDN endpoint: https://s3.eu-west-1.amazonaws.com/your-bucket/path/to/file.jpg
Custom subdomain: https://assets.your-domain.com/path/to/file.jpg
However, neither approach will work with SXG. If your page preloads an asset from a different origin than the one the page is loaded from—even if it's a subdomain—Cloudflare won’t include it as a subresource in the SXG version of your page.
One day, Cloudflare may start supporting the prefetching of subresources from subdomains. I’ve created a test to check its current support status, but as of the date of writing this post, that feature is not yet available.
Offloading your assets to CDN, a method meant to make your site load faster does the opposite in the context of SXG!

Proxy-based URL rewriting
No need to move your files back from the CDN to your server just yet!
What about using good old URL rewriting? This technique allows you to serve assets under a new, SXG-compatible URL.
If done on your server, it would function similarly to the previous solution, with the proxy gradually copying files into the local cache. But what if someone else could handle that for us? You guessed it—we'll use Cloudflare Workers again!
The Worker will leverage Cloudflare's cache, so if you're paying for egress traffic (like with Amazon Web Services), you'll also reduce your costs as an added bonus.
Worker implementation
Our goal is to send the user the contents of the https://cdn.com/your-bucket/image.jpg file to the user requesting the https://www.your-domain.com/cdn-proxy/image.jpg URL.
Create another worker project:
npm create cloudflare@latest -- url-rewriterNow, paste the following code into the src/index.js file:
const MAP = {
  'https://www.your-domain.com/cdn-proxy/':
  'https://cdn.com/your-bucket/',
  // You may add more mappings such as:
  // 'external-sxg-prefetchable-url': 'cdn-url'
}

export default {
  async fetch(request) {
    const url = request.url;
    // Find a mapping and apply to the url.
    // A detailed explanation can be found at:
    // https://blog.pawelpokrywka.com/p/subresources-prefetching-with-signed-exchanges
    for (let prefix in MAP) {
      if (url.indexOf(prefix) === 0) {
        const newUrl = request.url.replace(prefix, MAP[prefix]);
        request = new Request(newUrl);
        break;
      }
    }
    return fetch(request);
  },
};
Finally, deploy the worker:
npm run deployAnd add a route in the Cloudflare admin panel, so that the https://www.your-domain.com/cdn-proxy/* prefix is handled by the url-rewriter worker.
Try to access https://www.your-domain.com/cdn-proxy/image.jpg to see if it works.
Now, update your app to reference new URLs and you are ready to go! If the previously mentioned requirements are met, SXG prefetching for your assets should work correctly.
Interesting subresource types
Prefetching scripts or styles is simple. Some subresource classes, however, deserve further discussion.
Custom fonts
The general advice is to avoid custom fonts to improve performance, but it’s not always possible. There are at least three ways to implement custom fonts on your website:
Self-hosting: Treat font files as other assets and reference them from your CSS. In addition to the WOFF2 format, support for legacy browsers requires using the WOFF1 simultaneously. In the past, it was necessary to provide multiple file formats to ensure compatibility with older browsers. Things improved!
CSS embedding: Include reference to an external CSS file in your HTML which downloads the fonts in the format best suited for the user’s browser from the external font provider CDN. Examples: embedded Google Fonts, Web Fonts by Hoefler&Co.
Web font loader: Include a javascript snippet in your HTML that does the same as above. Example: Adobe Fonts when using the dynamic subsetting feature.
Avoid anything other than self-hosted fonts, because loading fonts from an external CDN doesn’t work with SXG prefetching. Also, CSS embedding and JavaScript loaders are terrible from a performance standpoint:
CSS method blocks font downloading until the CSS file is fetched from the font provider. The CSS file is hosted on an external domain, so it can’t be prefetched using SXG unless a proxying Cloudflare worker is used as a workaround. But it won’t work even then, because its content has to be dynamically generated depending on the User-Agent header. Caching it in Google SXG cache would interfere with this browser-sniffing mechanism.
The web font loader is even worse because it adds JavaScript loading and execution, slowing things down even more.

To self-host a font you need a @font-face declaration:
@font-face {
  font-family: "My custom font";
  src: url("/fonts/custom.woff2") format("woff2"),
       url("/fonts/custom.woff") format("woff");

  /* other properties, such as font-weight, etc. */
}
To enable SXG prefetching, place the following in the HTML head:
<link rel="preload" href="/fonts/custom.woff2" as="font" type="font/woff2" crossorigin="anonymous" />I added the type attribute to ensure that browsers without WOFF2 support won’t prefetch it.
The above snippet prefetches only the WOFF2 format for the reasons below:
Prefetching the legacy WOFF1 format could improve performance for a small number of users with older browsers (likely without SXG support). However, this would come at the cost of reduced performance for the majority of users with modern browsers. These browsers support both WOFF1 and WOFF2 formats, and prefetching both would result in downloading two files when only one is needed.
Also, adding another file to prefetch would consume one of 20 valuable SXG subresource slots.
Responsive images
The responsive images technique is about serving different images depending on the screen dimensions. A user owning a 32-inch, 8K-grade screen may appreciate a horizontal, high-resolution image. On the other hand, a low-end phone user on a metered connection would prefer a vertical, low-resolution image.
Here is an example of a responsive image:
<img src="wolf_400px.jpg" srcset="wolf_400px.jpg 400w, wolf_800px.jpg 800w, wolf_1600px.jpg 1600w" sizes="50vw">It will load the wolf_400px.jpg image on a small screen, wolf_800px.jpg on a larger screen, and wolf_1600px.jpg on the largest. The image specified in the href attribute is used by legacy browsers that do not support responsive images. The sizes attribute tells how much screen space is available for an image—in this case, it’s 50% of the screen width.
Let’s forget about SXG for a minute. If you want to speed up the loading of an image, you can prefetch it by placing a <link> tag in the HTML head. This way the browser will download the file very early, before the rest of the HTML is processed.
But which version of the image should be preloaded? To enable preloading for responsive images, you must specify additional attributes on the <link> preload tags that mimic srcset and sizes attributes on the <img> tags: imagesrcset and imagesizes accordingly (I used examples from this guide):
<link rel="preload" as="image" href="wolf_400px.jpg" imagesrcset="wolf_400px.jpg 400w, wolf_800px.jpg 800w, wolf_1600px.jpg 1600w" imagesizes="50vw">If your website uses responsive images, the good news is they can be optimally prefetched with SXG. The Google SXG cache stores all versions of the image and the user’s browser chooses which one to prefetch on the Google results page.
The first step to enable SXG prefetching of responsive images is to put the <link> tag in the HTML of your page as described above. This link will be translated into the following Link header in the SXG response by Cloudflare ASX:
Link: <https://example.com/wolf_400px.jpg>;rel=preload;as=image;imagesrcset="wolf_400px.jpg 400w, wolf_800px.jpg 800w, wolf_1600px.jpg 1600w";imagesizes="50vw",<https://example.com/wolf_400px.jpg>;rel=allowed-alt-sxg;header-integrity="sha256-mfpQfImL1YSp8DM3HW0y235K5of+vJAdM0pbIh9MAnI="I found Cloudflare ASX has a very strict HTML parser. If you include a new line in the attribute (such as imagesrcset) value, it won’t include this attribute in the resulting SXG response.
The Chrome browser parser is less strict, so in your local tests, everything will be fine. Be sure to minify your HTML before deployment or avoid newlines in <link> tags attributes.
However, when you try to prefetch your page you will get the following message in the Warning HTTP header of the SXG response from the Google SXG cache:
199 - "debug: content has ingestion error: SXG ingestion failure: Invalid link preload subresources; validating headers"That’s because Google SXG cache couldn’t find the integrity hash for all image versions. Cloudflare ASX generated it only for the wolf_400px.jpg (the version specified in the href attribute).
The solution is to prepare one <link> tag for each image version:
<link rel="preload" as="image" href="wolf_400px.jpg" imagesrcset="wolf_400px.jpg 400w, wolf_800px.jpg 800w, wolf_1600px.jpg 1600w" imagesizes="50vw">
<link rel="preload" as="image" href="wolf_800px.jpg" imagesrcset="wolf_400px.jpg 400w, wolf_800px.jpg 800w, wolf_1600px.jpg 1600w" imagesizes="50vw">
<link rel="preload" as="image" href="wolf_1600px.jpg" imagesrcset="wolf_400px.jpg 400w, wolf_800px.jpg 800w, wolf_1600px.jpg 1600w" imagesizes="50vw">
As you can see above, all of the tags look identical except the href attribute. As a result, Cloudflare ASX will generate integrity hashes for all versions:
Link: <https://example.com/wolf_400px.jpg>;rel=preload;as=image;imagesrcset="wolf_400px.jpg 400w, wolf_800px.jpg 800w, wolf_1600px.jpg 1600w";imagesizes="50vw",<https://example.com/wolf_400px.jpg>;rel=allowed-alt-sxg;header-integrity="sha256-mfpQfImL1YSp8DM3HW0y235K5of+vJAdM0pbIh9MAnI=",
<https://example.com/wolf_800px.jpg>;rel=preload;as=image;imagesrcset="wolf_400px.jpg 400w, wolf_800px.jpg 800w, wolf_1600px.jpg 1600w";imagesizes="50vw",<https://example.com/wolf_800px.jpg>;rel=allowed-alt-sxg;header-integrity="sha256-Xtd1ha7j8bRbUE/z7IULqPzPN4ZuUvapKBAEZ5XVvg8=",
<https://example.com/wolf_1600px.jpg>;rel=preload;as=image;imagesrcset="wolf_400px.jpg 400w, wolf_800px.jpg 800w, wolf_1600px.jpg 1600w";imagesizes="50vw",<https://example.com/wolf_1600px.jpg>;rel=allowed-alt-sxg;header-integrity="sha256-d0Pusf0qpsEUmIF+dTbvYa8pFmi4BmNt7/HzO0pHDiY="
As you can see, there is a lot of duplication here. It would be enough to have something like below, but I couldn’t find a way to achieve that with Cloudflare ASX other than preparing the Link header all by myself (including integrity hashes):
Link: <https://example.com/wolf_400px.jpg>;rel=preload;as=image;imagesrcset="wolf_400px.jpg 400w, wolf_800px.jpg 800w, wolf_1600px.jpg 1600w";imagesizes="50vw",<https://example.com/wolf_400px.jpg>;rel=allowed-alt-sxg;header-integrity="sha256-mfpQfImL1YSp8DM3HW0y235K5of+vJAdM0pbIh9MAnI=",
<https://example.com/wolf_800px.jpg>;rel=allowed-alt-sxg;header-integrity="sha256-Xtd1ha7j8bRbUE/z7IULqPzPN4ZuUvapKBAEZ5XVvg8=",
<https://example.com/wolf_1600px.jpg>;rel=allowed-alt-sxg;header-integrity="sha256-d0Pusf0qpsEUmIF+dTbvYa8pFmi4BmNt7/HzO0pHDiY="
Nonetheless, the Google SXG cache happily ingests the document with the verbose Link header value, and the warning about the SXG ingestion failure disappears. I prepared a demo page showcasing the correct and incorrect approaches to prefetching responsive images with SXG.
On the downside, older browsers will prefetch all the versions wasting the bandwidth. At the time of writing, this is 5% of desktop and 6% of mobile users, but it will decline. There may be ways to improve the experience for users of legacy browsers, but I haven’t researched them.
If—apart from SXG prefetching—you want to use responsive images with Early Hints I have bad news. At the time of writing responsive images are not supported with Early Hints.
However, this may change in the future. Additionally, remember that support for responsive images already exists in standard prefetching. Therefore, to fully benefit from responsive images in Next.js, you must adjust the link-adder worker (the first one mentioned in this post). Along with the href and as attributes, the worker must also support the imagesrcset and imagesizes attributes in cases they are set. The change should be fairly easy to implement, I’m sure you can handle it!
Images combined with a responsive layout
Responsive websites use different layouts depending on the screen dimensions. The common practice is to use a 1-column layout for mobile phones and 2+ columns on desktops.
If the columns contain graphics, the initial viewport on the phone will typically include 1 or 2 images, while on the desktop, the user will see more of them.
The efficient preloading/prefetching strategy avoids loading images that are not visible in the initial viewport. To save bandwidth, you want to load all the pictures the user sees when the page loads and no more than that.
The dilemma this time is not which version of the image, but which images to choose.
The first thing that comes to mind is using the media attribute on the <link> tag:
<link rel="preload" as="image" href="1.png">
<link rel="preload" as="image" href="2.png" media="(min-width: 800px)">
If the browser loads above HTML it will preload 2 images if the screen width is 800px or more. If it’s less, then only the first image will be preloaded.
However, things become different in the context of SXG prefetching. Cloudflare ASX correctly puts the media attribute in the Link header, but my tests show the browser ignores it. As a result, both images are loaded regardless of screen size.
I solved it by abusing adjusting the imagesrcset and imagesizes attributes on the <link> tags:
<link rel="preload" as="image" href="1.png">
<link rel="preload" as="image" href="2.png" imagesrcset="1.png 2w, 2.png 500w" imagesizes="(max-width: 799px) 1px">
The first <link> tag preloads 1.png unconditionally. However, the second <link> tag preloads 2.png only if the screen is 800px wide or more. Otherwise, it preloads 1.png again (the browser is smart enough to not perform a second request) and 2.png is not preloaded which meets the requirements.
It works because in the second <link> tag, the browser is being told:
2.png is 500 px wide,
1.png is 2px wide (not true),
for screen widths below 800px, there is only 1px room for the image (also not true).
The <link> tag is responsible for preloading, not rendering, therefore it doesn’t matter if some things are lies. Our goal is to preload the files. They will be rendered later using a <img> tag with a correct srcset and sizes attributes.
If the screen width is below 800px, the browser recognizes the space is limited (1px), so it checks which image has the closest width. As the browser thinks 1.png is 2px wide, it preloads it.
This approach may be combined with multiple image versions from the previous section. It requires introducing another image that is always preloaded and has only 1 version. You can mix different image formats, so an SVG logo may be a good candidate - it’s used everywhere and is scalable, so one file is enough:
<link rel="preload" as="image" href=1st-tiny.png" imagesrcset="1st-tiny.png 500w, 1st-big.png 1000w" imagesizes="(max-width: 750px) 100vw, 50vw">
<link rel="preload" as="image" href="1st-big.png" imagesrcset="1st-tiny.png 500w, 1st-big.png 1000w" imagesizes="(max-width: 750px) 100vw, 50vw">

<link rel="preload" as="image" href="logo.svg">

<link rel="preload" as="image" href="2nd-tiny.png" imagesrcset="logo.svg 2w, 2nd-tiny.png 500w, 2nd-big.png 1000w" imagesizes="(max-width: 750px) 1px, 50vw">
<link rel="preload" as="image" href="2nd-big.png" imagesrcset="logo.svg 2w, 2nd-tiny.png 500w, 2nd-big.png 1000w" imagesizes="(max-width: 750px) 1px, 50vw">
This approach works with SXG-prefetching. You can see it in action on the demo page.
Be careful about exceeding your subresource limit
It’s worth noting that depending on the number of images you want to prefetch and the number of versions of each image, it may quickly fill up all available subresource slots:
images × versions + logo + styles + javascripts + fonts + icons <= 20Even if your page uses only 1 CSS file, 1 javascript, 4 fonts (normal, bold, italic, bold italic), 1 icon, and 1 logo you are left with 12 slots, which allows you to preload:
12 images (all in 1 version),
6 images in 2 versions each,
4 images in 3 versions each,
3 images in 4 versions each,
2 images in 6 versions each (probably doesn’t make sense),
1 image in 12 versions (seems like an overkill).
It’s up to you to decide which subresources to prefetch for the best user experience.
Verifying prefetching of SXG subresources
Now, after you’ve applied all the hints you found here and in the previous part of the series, it’s time to check if your website is being correctly prefetched with subresources.
Instead of waiting until Google indexes your site, head over to the prefetch testing tool, type the URL of the page you want to test, and hit the Submit button to make the Google SXG cache aware of your page.
Give Google SXG cache time to fetch the page and all the subresources. In my experience, it should take no more than a minute, typically about 15 seconds.
Then, hit Submit again to prefetch everything.
Go offline in Chrome Dev Tools or disconnect your Internet connection.
Click the link to target link.
You should see your page instantly rendered with all the subresources you specified. If this is what you see—congrats, you did it! But don’t relax just yet—there’s more to come. For now, you can take a moment to admire this beautiful fresco:
However, if you see a “no internet” message or something similar to this instead:
Either you haven't waited long enough for the SXG cache, made an error somewhere, or… the SXG gods don't like you!
Troubleshooting
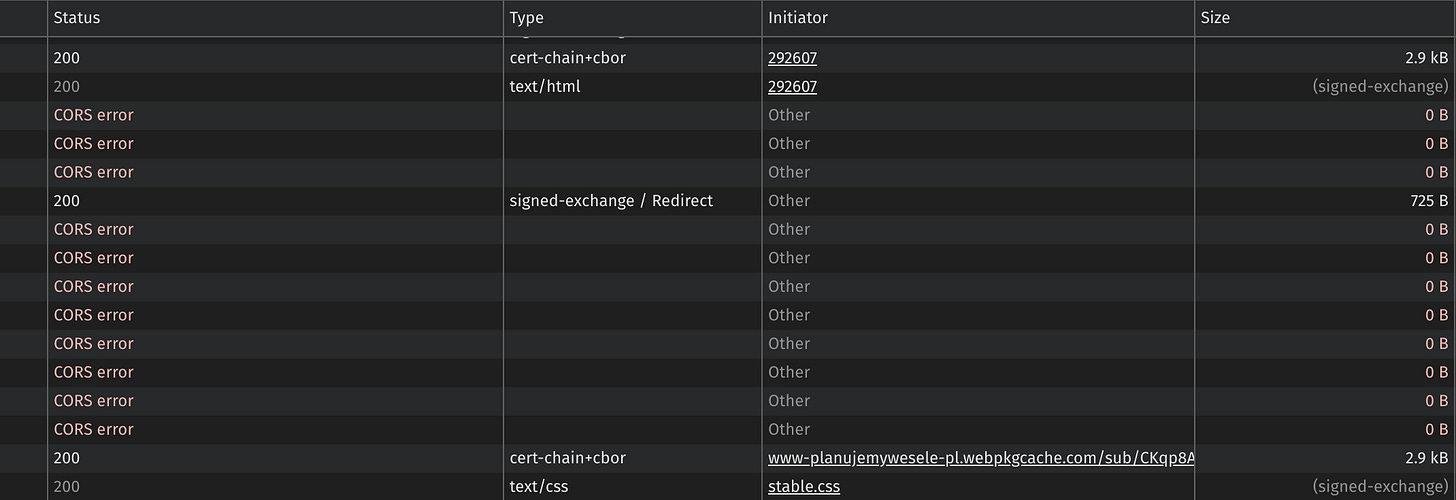
Don’t worry. Before you hit the Submit button in the prefetch testing tool, please open the Network tab in Chrome Dev Tools. You may see red CORS error messages after pressing this button.
Those errors like to appear randomly. Some pages may work correctly, some may not, while others only on Tuesdays. So even if your first test was successful, beware.
I was there, banging my head against the wall. I met every tiny requirement I could find in all the SXG documentation available online. Still, no luck!
Finally, I began researching this problem on my own. It took some time, but I believe I've identified the causes and the solutions for the most common issues. I’ll dive deeper into this topic in the next part. Spoiler alert: CORS is not to blame.
Thanks!
I hope this post will help you make your website load faster. Thank you for reading—you’re the best! :)
If you enjoyed the post, sharing it with your friends or co-workers is the best way to show your appreciation. I would really be grateful for that!
Interestingly, the metrics designed to measure page interactivity: First Input Delay (FID), and Interaction to Next Paint (INP) won’t improve if the scripts are prefetched.
In a nutshell, those metrics measure how fast the page reacts to user input (for example a button click). However, until the JavaScript loads, clicking the button doesn’t invoke any handler and the page doesn’t change, so that interaction is not measured. The user is frustrated because the button doesn’t work, but FID and INP are fine with that.
As a side note, INP measures also CSS transitions and built-in browser behaviors. So technically speaking, the JavaScript doesn’t need to be loaded for INP measurements of those interactions.
The data needed to calculate the integrity hash is explained in the definition of the header-integrity parameter from the Signed Exchange subresource substitution explainer. I highlighted the important part.
This header-integrity parameter is the SHA256 hash value of the signedHeaders value from the application/signed-exchange format for integrity checking. This signedHeaders is "the canonical serialization of the CBOR representation of the response headers of the exchange represented by the application/signed-exchange resource, excluding the Signature header field". So this value doesn’t change even if the publisher signs the content again or changes the signing key, but it does change if any of the headers or body change. (It catches changes to the body because a valid signed exchange's headers have to include a Digest value that covers the body.)
Rails automatically adding the Link header actually didn’t help at first. During my initial SXG experiments, I noticed this conflicted with SXG because the generated Link header didn’t contain the expected integrity hashes. As a result, as far as I remember, the page or the subresources were not prefetched on the Google results page.
My solution was to use middleware implemented as a Cloudflare worker to strip the Link header from HTTP responses to SXG requests. This fixed the issue while preserving Early Hints/standard prefetching for non-SXG requests.
While working on this post, I wrote a test demonstrating the issue. However, it seems no longer there: Cloudflare ASX overwrites the Link header set by the app for SXG requests. Either Cloudflare resolved the issue in the meantime, or I was wrong about it from the beginning, and other factors caused my problems.


